Lammas Costume - Basket
This is an add on to the Lammas Costume I made for Pagan Pride 2014. After people in my drama group saw it they decided it was ideal for this years 'The Outrageous Mother Goose Pantomime'.
Since I have a basket to carry I decided to make a cover to go with it. These are the pictures and instructions. Have skimped a little bit at the beginning due to the fact that I only thought about doing a write up until three quarters through.
First of all you need a basket. The shape of the cover will depend on the shape of the basket. Mine is a rectangular shape.
Plain Basket Side View

First of all choose your material. I am using cotton off cuts I saved from the Lammas Costume.
Take a piece large enough in width and length to go over the basket handle. It wants to be fairly sturdy material. It will need to go comfortably over the handle plus enough material to attach to other pieces of material .
Plain Basket View From Above

Make sure you leave enough material to make a good hem. I have decided to use Brown cotton for my base.
Cut out a rectangle in the centre.Check it fits nicely and hem both the cut out section and the edge of the material

Once you have done this you should end up with what looks like a Brown hemmed letter box.
This is your starting point for adding the rest of the material. Next you begin adding the rest of the material. I found it easiest to go around the length of the basket first. You can either do this in small sections or as I have done and for each side made long rectangular pieces.
Green Material Attached to Letterbox

I measured from the centre of the length of the basket to the centre of the width of the basket around the outside. I then made 4 lengths of rectangular material (2 for each end) and hemmed them. I then sewed one end to each of the of the centre points of the letter box. Then I sewed the 2 free ends together.Repeat for the other side.


Once you have added the sections that go around the basket you can start adding the rest of the material to the letter box section.
Selection of Hemmed Squares

The idea is to make a patchwork effect cover though if you wish you could just add one large piece of cloth. I have cut out and hemmed a selection of squares in a variety of colours.


Sewn Squares Reverse View


When you have finished adding all your squares it should look as shown in the pictures below.


Next you have to think about covering the gap in between the two sections of covers.
Green Flap

I also chose to use slightly thicker stiffer material so they would not drop down into the basket. Once I had cut out the rectangles I hemmed them. Next was to pin the rectangles into place prior to sewing.

I pinned ONE flap as close as I could to the basket handle without rucking. I ensured that it would bridge the gap comfortably.
First Sewn Flap

When you have completed that side you can then turn the corner and continue sewing along the length of the flap.Now the third side depends on how far back you placed your flap.

Before sewing the third side pin the second flap into place. This is because you want to be able to tuck the second flap under the first to hold it. Once you have pinned the second flap you will be able to tell if you need to sew any part of the third side.

If you need to sew any of the third side I suggest that you do a stitch at a time. That way you can keep checking that the second flap fits snugly under the first.
Overlapped Flaps

As you can see in the photograph the flaps interlock nicely. If there is any gap at the side by the handle more squares can be added to cover it.
Hemmed Triangles

In order to match the skirt from the Lammas Costume I cut out some triangles in various colours and sizes.
Hem around the triangles as you did the squares and rectangles.

After pinning the triangles where you want them you can sew them into place.


Now the cover is finished you can turn your attention to the basket handle. That is of course if you wish to do so. As my basket was bought second hand some of the weaving had come loose and was also missing in places.
First remove the cover and start with the plain basket shown below.
Plain Basket


Take a long piece of ribbon. I chose an orange coloured piece of ribbon roughly an inch and a half in width. Since ribbon frays quite easily I would hem the ends.
Pinned Ribbon

Wrap one end around the bottom part of the handle and pin it.


Begin winding the ribbon around the handle of the basket. Keep it nice and tight so it doesn't unravel. Keep winding until you reach the other side of the basket. Then either sew, pin or glue the other end of the ribbon.
Fully Wrapped Ribbon

When you have finished wrapping and fixed the end of the ribbon you can replace cover.
Finished Basket

This is an add on to the Lammas Costume I made for Pagan Pride 2014. After people in my drama group saw it they decided it was ideal for this years 'The Outrageous Mother Goose Pantomime'.
Since I have a basket to carry I decided to make a cover to go with it. These are the pictures and instructions. Have skimped a little bit at the beginning due to the fact that I only thought about doing a write up until three quarters through.
First of all you need a basket. The shape of the cover will depend on the shape of the basket. Mine is a rectangular shape.
Plain Basket Side View

First of all choose your material. I am using cotton off cuts I saved from the Lammas Costume.
Take a piece large enough in width and length to go over the basket handle. It wants to be fairly sturdy material. It will need to go comfortably over the handle plus enough material to attach to other pieces of material .
Plain Basket View From Above

Make sure you leave enough material to make a good hem. I have decided to use Brown cotton for my base.
Brown Letter Box Shape Over Handle

Once you have done this you should end up with what looks like a Brown hemmed letter box.
This is your starting point for adding the rest of the material. Next you begin adding the rest of the material. I found it easiest to go around the length of the basket first. You can either do this in small sections or as I have done and for each side made long rectangular pieces.
Green Material Attached to Letterbox

I measured from the centre of the length of the basket to the centre of the width of the basket around the outside. I then made 4 lengths of rectangular material (2 for each end) and hemmed them. I then sewed one end to each of the of the centre points of the letter box. Then I sewed the 2 free ends together.Repeat for the other side.
Joined Green Lengths
Off Basket


Joined Green
Lengths On Basket
Lengths On Basket


Once you have added the sections that go around the basket you can start adding the rest of the material to the letter box section.
Selection of Hemmed Squares

The idea is to make a patchwork effect cover though if you wish you could just add one large piece of cloth. I have cut out and hemmed a selection of squares in a variety of colours.
An example of green squares can be seen here.I pinned and sewed the squares onto the Brown letter box until I had enough to cover the top of the basket.
Pinned Squares


When you have finished adding all your squares it should look as shown in the pictures below.
With Squares added showing the Basket Opening


Next you have to think about covering the gap in between the two sections of covers.
This I did by cutting a couple of rectangles big enough to bridge the gap and cover the width. I decided to use a darker green to do this so I could easily identify which were the gap covers in a hurry.
Green Flap

I also chose to use slightly thicker stiffer material so they would not drop down into the basket. Once I had cut out the rectangles I hemmed them. Next was to pin the rectangles into place prior to sewing.
Pinned Flap

I pinned ONE flap as close as I could to the basket handle without rucking. I ensured that it would bridge the gap comfortably.
The next part is very important otherwise you might have to unpick and start again.Start sewing on the side nearest to the basket handle.
First Sewn Flap

When you have completed that side you can then turn the corner and continue sewing along the length of the flap.Now the third side depends on how far back you placed your flap.
Second Flap Pinned

Before sewing the third side pin the second flap into place. This is because you want to be able to tuck the second flap under the first to hold it. Once you have pinned the second flap you will be able to tell if you need to sew any part of the third side.
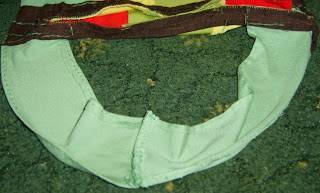
Both Flaps Sewn

If you need to sew any of the third side I suggest that you do a stitch at a time. That way you can keep checking that the second flap fits snugly under the first.
Overlapped Flaps

As you can see in the photograph the flaps interlock nicely. If there is any gap at the side by the handle more squares can be added to cover it.
Hemmed Triangles

In order to match the skirt from the Lammas Costume I cut out some triangles in various colours and sizes.
Hem around the triangles as you did the squares and rectangles.
Then pin them all around the basket.
Pinned Triangles

After pinning the triangles where you want them you can sew them into place.
Sewn Triangles


Now the cover is finished you can turn your attention to the basket handle. That is of course if you wish to do so. As my basket was bought second hand some of the weaving had come loose and was also missing in places.
First remove the cover and start with the plain basket shown below.
Plain Basket


Orange Hemmed Ribbon

Take a long piece of ribbon. I chose an orange coloured piece of ribbon roughly an inch and a half in width. Since ribbon frays quite easily I would hem the ends.
Pinned Ribbon

Wrap one end around the bottom part of the handle and pin it.
Sewn Ribbon Front and Back


Begin winding the ribbon around the handle of the basket. Keep it nice and tight so it doesn't unravel. Keep winding until you reach the other side of the basket. Then either sew, pin or glue the other end of the ribbon.
Fully Wrapped Ribbon

When you have finished wrapping and fixed the end of the ribbon you can replace cover.
Finished Basket
That is the Basket Cover finished and ready for use. However at a later date I may decide to add more triangles and decoration. Hope you enjoyed this blog.
No comments:
Post a Comment